Instrument calibration
Room calibration needs to be done regularly to ensure that the instrument measures O2 and CO2 as accurately as possible. It is also necessary to calibrate for N(itrogen).
Instrument calibration is done in two steps, gass calibration and column calibration. To log into the systems with administrator rights, use "s4b13" as the login.
Gass calibration
Gas calibration is done before a measurement day, and it lasts for the following 3 days.
1. The instruments must have been turned on at least 3 hours before the calibration can start.
2. Ventilation (air-condition) have to be on latest the night before:
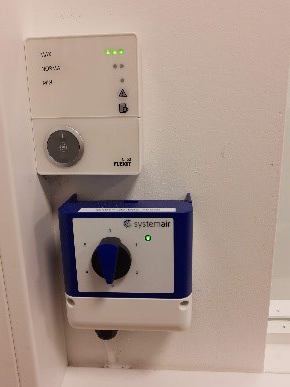
a. Circulation (blue box) is set on step 5 (see picture).
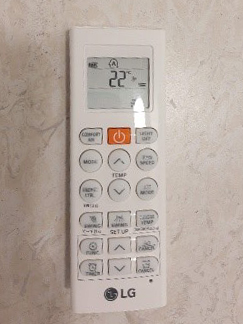
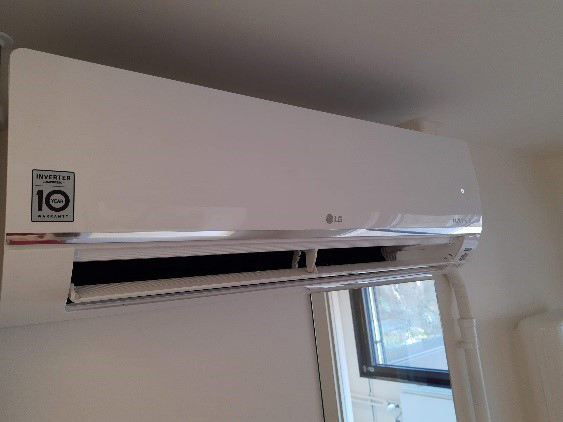
b. Turn on the ventilation in the room (AC) with the remote: "Mode" Auto -22°C, adjust with "Swing" (see pictures).
c. From the control room, open CaloScreen and click "Re-awaken system".
d. Close all the doors to the rooms, but leave the door to the hallway ajar.
e. Put up the sign on the door.
3. Look on the illustration pictures on the wall, and open the correct pipes to the room in use.
4. Remove the glass column that is connected to the Promethion instrument.
5. Open the nitrogen tank, and see that the pressure rises. Connect the tube to the upper outlet on the Promethion instrument.
6. By turning the button on the box on the wall, the pressure can be adjusted. The marker in the box should lay between 1,5 and 2 during the calibration.
7. Control that there is gas flowing from the T-shaped part of the tube (feel with your fingers or lips).
8. Open CaloScreen on the PC and click "Span & Zero".
9. Type in CO2-span to …. (this number comes with the gas tank on a certificate)
10. Press "Start", and wait 25 minutes. The nitrogen now flows through the pipes.
11. After 25 min, see under "Analyzer". Check that all numbers are close to 0.
12. Click "Zero" on all, and “yes” for CO2, O2 and WVP.
13. Click "Stop", take the tube off , and then click "OK"
14. Shut the nitrogen tank off. Check that the marker on the box on the wall goes to 0.
15. The same principle goes for the CO2 as well
16. Open the CO2-tank, and connect the tube to the upper outlet. By turning the button on the box on the wall, the pressure can be adjusted. The marker in the box should lay between 1,5 and 2 during the calibration.
17. Control that there is gas flowing from the T-shaped part of the tube (feel with your fingers).
18. Check that the CO2-span is the same as on the certificate.
19. Click "Start" and wait 5 minutes.
20. Under "Analyzer 1 og 2" click span + span + stop.
21. Take the tube off, press "OK" and shut the CO2 tank off.
22. Check that the marker on the box on the wall goes to 0.
23. Put the glass column back.
Calibration of the glass column
This is preferably done before each measurement day, and at least every third day when used frequently. This takes about 45 minutes for the RMR room, and up to 90 minutes for the 24h and exercise rooms.
1. Controll that the glass column is connected to the instrument correctly. "Up" is supposed to go up.
2. Check off for "Calibration recording" in CaloScreen.
3. Select "Advanced" and control the follow values: 5,5,5,10,10,750,250,1000, Baseline interval: 0.42, baseline duration: 2. (this depends on the duration of the measurement).
4. Go to main and type in the following:
- Body mass: 10
- Subj.code: Equ
- Treatment: 1
- Investigator: <name>
- Project name: Equ
- Excurrent Flow rate: 100 for RMR+ Exercise, and 80 for 24h
5. Press "Check system operation". If there is an error, press it again. This usually helps. If not, the system has to be restarted.
6. Press "Record" and save the file, preferably in an own project folder.
7. You can follow the measurement by clicking "Show display".
8. The measurement ends automatically with the message "Calibration complete".
Stine M. Ulven, Hege Berg Henriksen, Nasser E. Bastani, Thomas Olsen.